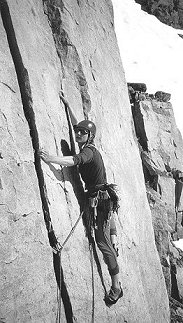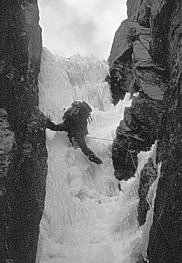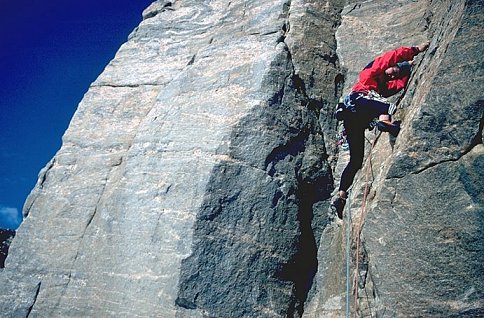
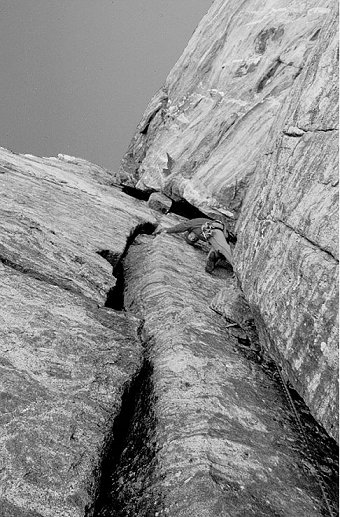
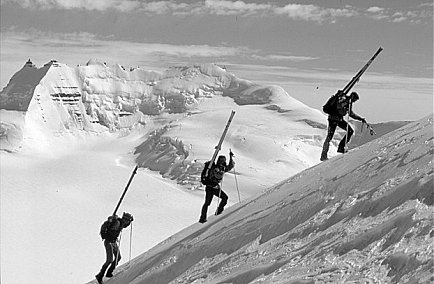
Nic climbing on the Castle
The Expedition climbed 32 routes including first ascents of 20 unclimbed mountains. Fine weather allowed us to climb twice as many unclimbed mountains as we hoped. A variety of mountains and routes were climbed. To give some examples:
Routes in the Lemon Mountains were climbed from two base camps at 1220m and 1440m, and those in the Lindbergh mountains were climbed from a base camp at 2090m.
The Lemon Mountains offer outstanding opportunities for mountaineering. There still remain many unclimbed peaks in the area offering both difficult snow and rock routes. On the Sarah and Chisel Glaciers there are still significant and challenging objectives for a future expeditions, making only first ascents. Routes we sighted on some of these unclimbed peaks are also given below.
Remaining routes would be at a similar range of grades to the routes we climbed; we did not aim to pick the easiest or most difficult routes on the glacier.
A summary of peaks climbed is given in an appendix. Route descriptions are shown below.
Notes:
Failed Attempts: we experienced poor north-facing snow conditions during the expedition, this resulted in us failing on several routes (Chisel 2 North ridge, Trident N Face and Sheridan Light N Ridge)
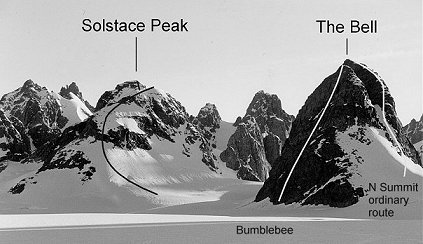
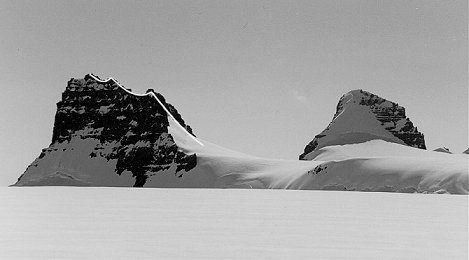
Solstice Peak (1750m). First Ascent
Ascend E face at end of SE ridge to gain ridge, scrambling through two rocky bands. Follow ridge to second summit and then to main summit. Descent route is reverse of ascent.
French’s Peak (1750m). First Ascent
|
|
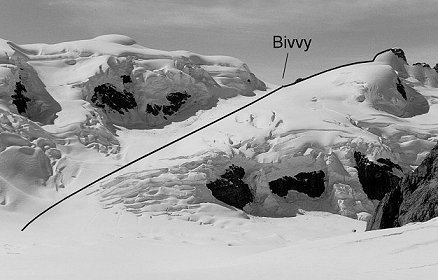
Above: Solstice and Bell viewed from South East on Chisel Glacier Left: French’s Peak (from West), with Cathedral (far LHS) and Coxcombe (rock pyramid in centre) |
Ascend snowy couloir left of first step. Pass on the left and cross a snow saddle. Go over the second step and descend to a narrow saddle. Climb broken ground to the right-trending groove in the centre of the face. Climb this in 3 or 4 pitches (different routes by two parties), crossing a snow patch at two thirds height, and trend left up slates to reach snowy summit (rock to III). Descend from left-hand end of the summit in two abseils from blocks down steep snow to the glacier. Walk back round the peak on the glacier between French’s Peak and the Needle.
Citadel (2550m). First Ascent
|
Ascend large snow face on S face of mountain to highest right-trending snow gully that leads to col on E ridge. Eight pitches of rock up to V- lead to level summit ridge (keep to right of broad ridge, finally traversing left, just below level summit ridge). Six pitches along summit ridge on rock to IV- lead to final snow pitch to summit. Descent route is reverse of ascent (5 abseils). Carrying axes, plastic boots and crampons to summit ridge is advisable, to allow quicker traverse on snow/ice to summit. |
|
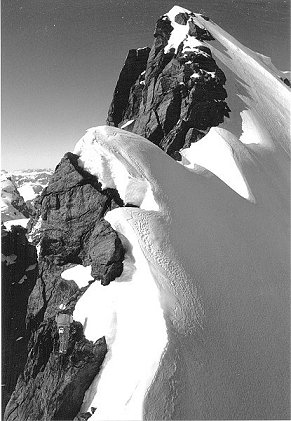
Top: Citadel South Face
Right: Citadel summit ridge from East. Our route was a hand traverse of the rock on the LHS (rather airy) since we had not brought axes or plastic boots with us!
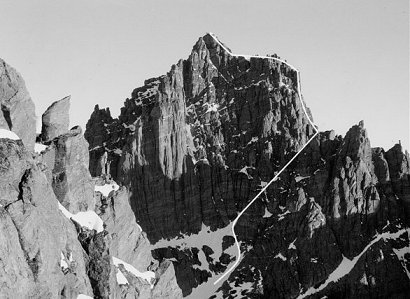
The Bell, North Summit (1660m). First Ascent
Ascend the E facing broad couloir between the N and S summits. At the bealach break out onto the crescent shaped ridge. Initially loose rock requiring care leads to fun scrambing close to the crest. An easy slope leads to the summit. For topo see Solstice Peak photo.
Bell North Face
Start at foot of pillar on far left of west face.
Descent is just right of ascent via five abseils.
The Bell, South Summit (1600m, E). New Route
Start at the SW side just right of the main avalanche/stone fall line. Obvious right hand crack line to big bay. Then follow next crack line to ridge. From ridge follow steep ground trending rightwards. Another crack line pitch leads to just above steep band. Again, easier ground leads to the summit. Descent left of ascent (3 abseils) – some loose rock. For topo see Solstice Peak photo.
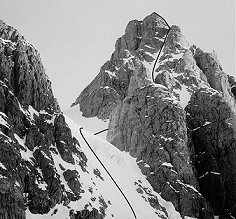
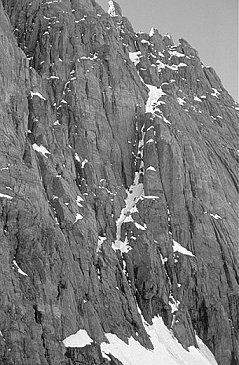
Chisel North Buttress. New Route
 Chisel N Buttress
Start at small ledge/snowpatch at lowest part of buttress.
Descent is reverse of ascent (6 abseils).
Sheridan Dark (2050m). First Ascent
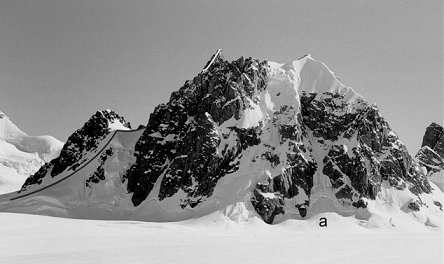
Sheridan Dark and Light (N Face). Attempted line on Sheridan Light began at ‘a’.
|
|
Ski to base of snow slope left of buttress on E face. Ascend snow slope to col, 45° . Ascend prominent snow gulley 60° to steep rock step and ice to small col (III). Ascend snow slope steepening to 55° and rock step to ridge (III). Snow right of ridge leads to snow-plastered slab and rock back to summit block (IV/V). Cracks in rock lead to summit (III). Descent is reverse of ascent (3 abseils). |
Sheridan Dark, South Face
Attempt on Sheridan Light (2000m, E). Attempt Failed
Route aborted due to poor snow conditions and avalanche risk.
The Spire (2260m). First Ascent
Spire East Face. Viewed from the West this peak is an impressive rock spire.
Approach from SE through large crevasse field. Head up obvious large snow gully to col, 45° . Trend right up smaller gully to short rock step leading to summit block. Descent is reverse of ascent (no abseiling necessary).
The Congregation (1750m, E). First Ascent
Approach from Needle Glacier and ascend E ridge (snow ridge) to summit. Descent route is reverse of ascent. (Peak used to recce snow route on Pulpit).
Icon Peak (2160m, P). New Route to Summit
Approach from col on Chisel Glacier. Ascend right hand flank/shoulder visible from Porpoise Glacier, trend left avoiding large crevasses and ascend left flank to summit. Descent is reverse of ascent.
The Pulpit (2110m?). First Ascent
Above: Pulpit South Face viewed from Congregation
Below: Pulpit West Ridge viewed from Citadel
Approach from the south, crossing the col just south of Pulpit from Sarah G. to Coxcombe G. The route follows an obvious NE facing couloir of II/III climbing on neve and ice (at approximately half height an optional vertical pitch was taken at III/IV on water ice). From the top of the gully make a descending traverse on rock (IV-) to another gully. Ascend this, then a short rock step to the pedestal-like summit. Descent is reverse of ascent. Ice pitch can be bypassed on the left.
|
Ascend steepish hanging glacier (at its least steep) to the left of a rock outcrop. From here, snow plod up towards the rock face, in between craglets as one sees fit. Keep going on steepening snow, trending slightly left, and keeping below "the" corner, that leads to a short wall.
Descend by three abseils and down climb the snow |
|
Pulpit, "Spiney’s Corner"
Rock Routes on The Haystooks (1800m). First Ascent
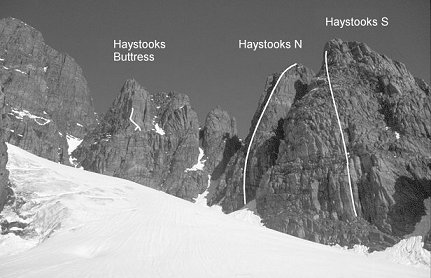
Above: The Haystooks from Chisel Glacier. Below: Routes on Haystooks Buttress
|
|
At the rear of the corrie there is an obvious tower of clean gneiss. This route and the following take separate lines to climb the tower direct (attempted). Start in the obvious bay at the base of the crag.
|
|
The upper wall was attempted via two routes, est. VII+. The group retreated estimating a further 4 pitches to the top. Descent by 4 abseils down the route and two sections of down climbing.
See previous route for approach. Start lower and approximately 25-30 metres right of the obvious bay at the base of the crag.
|
|
Descent as for previous route.
Above: Tom on "Tony’s Slate
Approach as for previous routes, but cross the large gully to the north and ascend the SW corner of the neighbouring peak. The route follows the line of least resistance from gully bottom to summit but avoids the long steep walls that tower above the wet shaded gully.
Descent is reverse of ascent: 6 abseils.
|
|
Richard on pitch 1 of Haystook S |
The route begins at the lowest point on the SW corner of the mountain and follows a generally direct line to the summit, trending left, to approach the summit at the left side of the obvious summit W face.
Note: Only half of final pitch was completed as 4/5 size 4 friends or hex 11 needed for protection.
Chalfoun Peak (1660m). First Ascent
The route starts from the centre of the corrie on the N and W facing side. Then follows a large gully and finishes at a huge cornice. The summit is third from the right and is approached from the left via a very slushy traverse with loose rock. Descent is reverse of ascent, including one abseil of 25m.
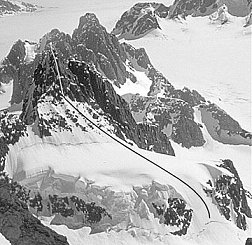
Chisel 2. Attempt Failed
Attempt aborted due to poor N facing snow conditions.
Chisel 2 viewed from Chisel Glacier. Extent of Attempted line shown
Ivor-y-Engine (2100m). First Ascent
Position: N68°
29’51" W31°
59’12"
Route: E Face, AD-, ascent 3 hours, descent 1.5 hours
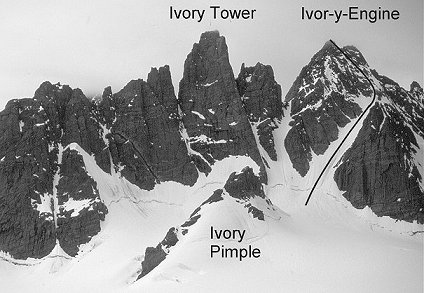
The mountain was approached from the south skiing high up a corrie glacier just underneath a broad snow ramp to the east of the mountain.
Climb the ramp to the col and a further ramp 50m north, following the snow arete. Then turn left on snow (to 55° ) through mixed ground to a col to the N of the summit. Short pitch of rock (IV+) to summit. Descent as ascent.
The Vestry (2215m?). First Ascent
Ascend the right of the serac field, as for the approach to the Citadel. Bear right on reaching the col, up a tributary glacier. Climb this glacier as it curves back round to the left, crossing several large crevasses/bergshrunds which span the whole glacier. Steep snow leads to a snow ridge at the top of the slope. Follow this rightwards to broken rocky ground. Then climb the rock (III) to the summit. Descent is reverse of ascent. One abseil from summit, then down-climb rest of rock and snow.
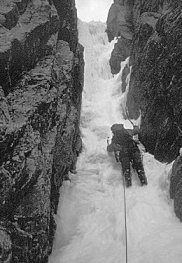
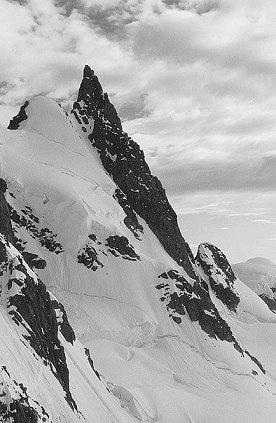
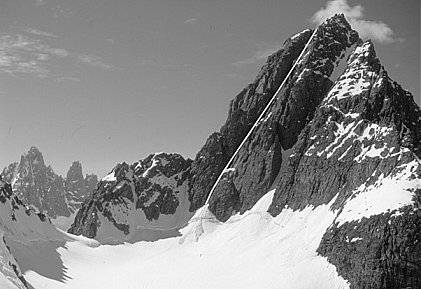
The Steeple (2360m, M). First Ascent
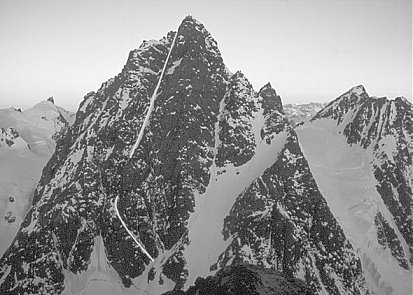
Steeple East Face viewed from Ivor-y-Engine. Crux ice is behind buttress at one-third height
The route essentially takes the line of a dyke approached via a ramp line. Initially this is a narrow chimney followed by an open couloir (E face).
Cross the bergshrund and approach the ramp line which trends left on neve and mixed ground (III) crossing an ‘airy’ corner. Climb the chimney direct on water ice taking belays on the left wall (the two main pitches being V, 5 and IV, 5). Continue on 45/50° neve up the open couloir until a short ice step is reached. Ascend this and take two pitches on 50° hard ice (III) before breaking right up a small chimney and entertaining mixed ground. A single pitch leads to the summit at IV.
|
|
Steeple. Rupert on snow ramp, below main gully |
For descent, abseil line of ascent to base of chimney. Two further abseils straight down lead to snow slope. Bergshrund was also ‘abbed’ on first ascent.
|
|
|
|
Steeple: Rupert leading crux ice pitch
Frankincense. New Route
Approach the lowest rock slabs on the SW side of the rock buttress. These were then followed to above the snow gully. Then crossed left taking the obvious rock gully.
Note: We descended from here but reckon four pitches of 4a-5a would take you trending left to the summit. Five abseils to the bottom.
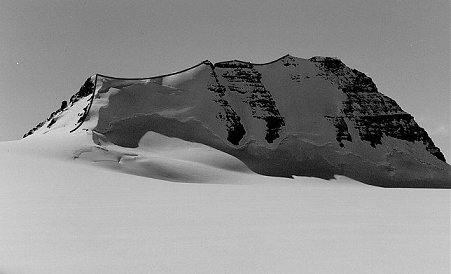
Bidvest Peak (1915m). First Ascent
Top: Bidvest Peak East Face. Below: Bidvest Peak summit from South
Ascend E face to col on skis. Continue on skis up snow covered N facing snow ridge. Snow slope and rock ridge to snow covered summit.
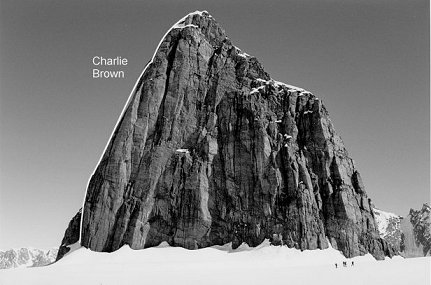
Routes on The Castle (2000m). First Ascent
Castle East Face
The route follows the straight ‘left-to-right’ slanting crack in the middle of the face starting at its origin on the left.
The party got about halfway up the face, pretty much climbing at their limit. The way ahead looked possible to climb, but if anything a bit harder, so they "quit while they were ahead". The descent involved two abseils down the same line.
Start in the middle of the face to the bottom left of the spire forming the right hand buttress of the Castle.
Descent involves approximately 100m of down-climbing, then five abseils back down the route.
|
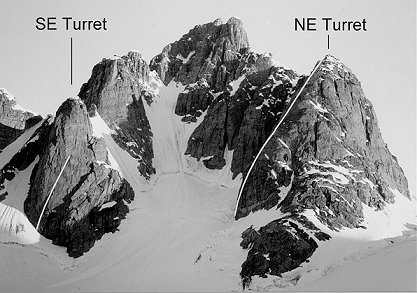
Castle West Face |
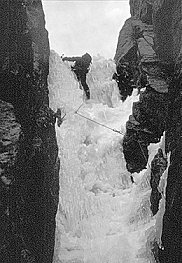
Begin by ascending the wide snow gully on the W face of the Castle. This turns right and leads to a huge terrace below the huge cleft in the mountain. The rock route follows the right hand side of the cleft, trending rightwards to the right hand arete. This then leads to the summit.
Descent is reverse of ascent via 3 abseils, then 3 further abseils down snow gully before down climbing. |
As for above to the beginning of the rock. Where the previous route traverses left to the start of the S Tower, plod a couple of metres up to a ledge at the bottom of the N Tower.
Descend by 3 abseils to big boots, then as for above.
The Ivory Pimple. First Ascent
 Ivory Pimple North ridge
Mixed line of snow and rock (scrambing only) up N ridge.
Muezzin. First Ascent
From N ascend hard ice to W of peak. Climb rock arete from col to summit. Climbed to recce route on Minaret
Attempts on The Watchtower. Attempts Failed
Two attempts were made on the Watchtower:
|
|
Beacon (Left) and Watchtower (Right) taken from Steeple. Attepted lines via ‘a’ and ‘c’ failed due to large crevasses. Reaching col ‘b’ via a traverse behind Beacon looked long and difficult Suggested route is via ‘d’ or near ‘c’ |
From the col behind the Steeple and in front of the Beacon, ascend the crevassed snowfield to the right hand shoulder of the Beacon. The attempt was abandoned at this point due to bad weather, and because
the abseil looked more than 50m.
The second attempt abseiled from the top of the shoulder, just before an impassable crevasse. The party abseiled over the lip of the serac, over to the rocky spur, then 100m down the spur. At this point the pair were about 30m above the bergshrund, which looked impassable, thus necessitating a retreat (by ascending fixed ropes).
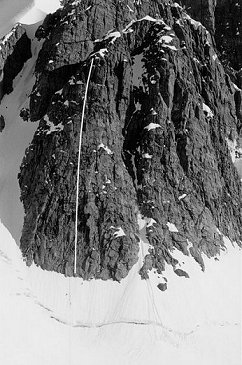
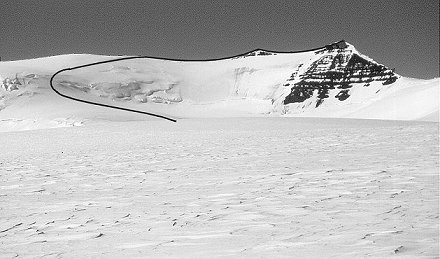
Attempt on Trident. Attempt Failed
First Ascent of Trident in 1993 by Lower, Ferguson. NE Couloir/E Ridge, TD
|
|
|
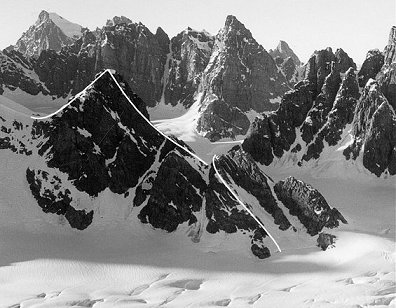
Left: profile of Trident North face viewed from Castle.
Right: close-up of gully in Trident North face
This impressive mountain has an exciting-looking twisting ice gully (est. IV/V) running up its north face. This was the attempted line. The attempt failed due to broken rock and running water. In colder conditions the route may be possible; alternatively a rock buttress to the left of the attempted line may give access to the ice (est. 50m, V)
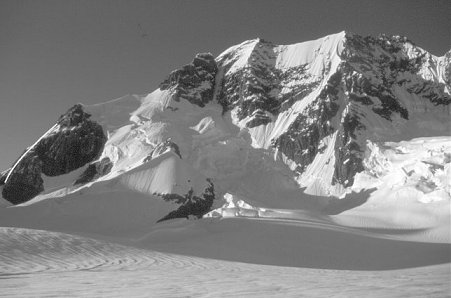
RJ’s Peak (2850m?). First Ascent
Top: RJ’s Peak East Face. Bottom: Jætteborg viewed from RJ’s Peak
The mountain was approached from the E onto the S ridge of the peak. The S ridge was gained at the lowest-angled point of a broad E facing shoulder. From the summit a SW traverse was made to the lowest point of the col East of Pt. 2800m (Tarongabong N68° 57’ W31° 09’. Cross the crevasses at the col below (40° /45° ) to access a wide ski slope that allows a ski descent to the glacier S of the mountain.
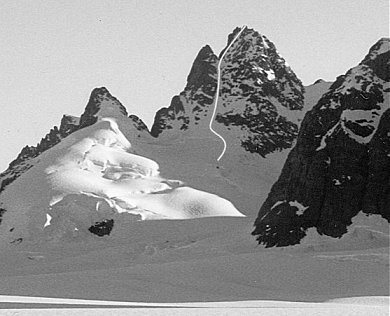
The Galleon (2200m). First Ascent
|
|
Galleon (Left) and an unnamed peak |
This mountain is the northernmost peak of a group of three nunataks. Approach mountain from W, route climbs W ridge to summit. Climb W snow face then follow gully on right hand side (to 50° ; 50m) then follow scree to ridge. Traverse rock ridge (III-) with snow patches to summit block.
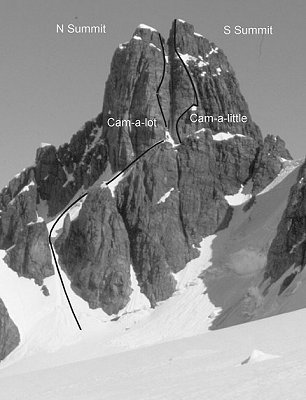
Cameron Peak (2300m). First Ascent
|
|
Cameron Peak West Face |
The summit was gained by a traverse of the mountain from the N.
Climb the snow shoulder N of the mountain to access the end of the NE ridge (summit ridge). Traverse the summit ridge to a rock summit. Abseil or down-climb a 25m rock step. Climb the rock step opposite (IV-, 12m) and continue along the snow ridge to summit. Descent is reverse of ascent with one abseil at rock step